Tampilkan postingan dengan label Tips and Tricks. Tampilkan semua postingan

I can't open my Flash drive

Transcend JF V10 8GBQuestion:- I can't open my flash drive. When I inserted it to my computer it would just appear a removable disk and then when I tried to open it tells that there is no disk on the dirve. Can this be fixed? what should I do to open it so that I can Use it again. Hope you can help me with this problem. thanks!

Answer:- When it shows "Removable Disk"....Right clicked & hit Properties.......then filled in a Name in the Summary tab (my name)....suddenly got a pop up & wow......it started working again.....whew.....it was some relief !!!

I am using Transcend JF V10 8GB
Try it out....
All d Best
More aboutI can't open my Flash drive

Facebook Trick-Public Search Control


Facebook Trick-Public Search Control

Facebook Trick-Public Search Control

MYTH: Facebook doesn’t let me control whether I can be searched on Google, or other public search engines.

TRICK: 
False. You have a public search control. Here’s how to get to it:

1.Go to Account drop-down, click Privacy Settings
2.Under Apps and Websites, click Edit your settings
3.To the right of public search, click the Edit Settings box
4.Check or uncheck to Enable public search
More aboutFacebook Trick-Public Search Control

Facebook Keyboard Shortcuts


Before using Facebook keyboard shortcuts, determine the modifier keys for your computer, which is based off what browser and operating system you are using.

Win & ChromeWin & FirefoxWin & IEOSX & FirefoxOSX & Other
AltAlt + ShiftAltFunction + CtrlOption + Ctrl

Once you have determined the modifier for your operating system and browser use the above key combination with any of the below 10 keys to perform the desired shortcut. For example, if you were using Firefox in Windows and wanted to go to the Facebook Home you could press Alt + Shift + 1.
Tip If you are using Internet Explorer, after pressing Alt + # let go of both keys and press Enter for the shortcut to work. For example, press Alt + 1 (let go) and then press Enter to open the Facebook home page. * Also, the M to open a new message in Internet Explorer does not work, since it is the home shortcut.

MOpen a new message *
?Go to the Facebook Search
1Home (News Feed)
2Your profile page
3Friend requests
4Messages
5Notifications
6Your Account Settings
7Your Privacy Settings
8Go to the Facebook page
9View Facebook Statements and Rights agreement
0Open Facebook help center
More aboutFacebook Keyboard Shortcuts

How To Completely Clean Your Hacked WordPress Installation

How To Remove Hacked By From Wordpress Blog

How To Completely Clean Your Hacked WordPress InstallationGetting hacked sucks, plain and simple. It can affect your rankings, cause your readership to be exposed to virus and trojan attacks, make you an unwilling promoter to subject material you may not actually endorse, and in many cases cause the loss of valuable content. However, once it happens it is usually best to not procrastinate on the clean up process, since a speedy restore will most times minimize the damage that was caused.

While almost all sources will recommend that you upgrade your WordPress to the latest version, what the majority neglect to tell you is that in most cases simply doing so will not prevent the attackers from getting back in, even if there are no known exploits with the latest version. The hackers may have left a back door file hidden in a directory where it wouldn't get overwritten with an upgrade, or inserted code into your theme, or simply created an account that they then granted admin privileges to. Any one of those would allow them back in, even after you patched what was wrong the first time. Therefore I am providing this step by step process on how to completely clean out and restore a WordPress installation that has been hacked.


If your wordpress blog has been Hacked,Then don't worry.I will tell you how to remove that script from your blog files.First of all i suggest to all always use strong password for your ftp,always use trusted plugins for your wordpress blog.Use secure ftp for files uploading,


Now come to point,if you got hacked by (anyname) virus in your wordpress blog,then first of all change your ftp passwords.Open files folder.Then just remove index.html & index.php,Now upload fresh index file.Your blog will work again.

Thank You
Link Building Services
More aboutHow To Completely Clean Your Hacked WordPress Installation

Remove Follower From My Blog

A couple of weeks ago, I took a look at the followers list in my sidebar and was shocked to see a not-so-family-friendly image staring back at me. I immediately started looking to see if there was a way to remove the photo (and the follower) from my blog. Thankfully, there is!

I learned that you can block offending followers from receiving your blog posts on their dashboard via Google Friend Connect. Unfortunately, you can't completely block a person from viewing your blog. They can still visit by entering in your url (web address) directly or they can subscribe through another reader.

How to block a Google Friend Connect follower

1. Log into your blog and go to your dashboard.

2. Click on #Followers beside the title of your blog.


3. Find and click on the offensive follower's photo.


4. Click on 'Block this user'.


5. Click on 'Block'.


Bye bye offending follower! :)
More aboutRemove Follower From My Blog

Automatically Submit Your Blog RSS Feed to Digg

Digg logoWith Digg’s recent upgrade, an amazing thing happened- you can auto-submit links to Digg from your blog’s RSS feed! Yay- no more manual submissions.

But, my excitement dwindled, when I could no longer remember how to get there- not familiar with Digg’s new interface. I figured it out again and here’s how to submit your RSS feed to Digg:
1. Login to Digg
2. Click to the arrow just right of your icon at the top of the page, and select ‘Settings’
3. On the left of the page, you’ll then see Import Feeds… click that.
4. Now, enter your feed URL and it will provide your code, something like this: <!--a8bdfsa849629e12682340e83423a—>
5. Copy and paste that piece of code (the second one with <!—and –> around it) and paste it into a new post in your WordPress blog. You can save it as a draft for now.
6. The next time you post to your blog, make sure you have that code there. Don’t worry, it’s invisible when you paste it in the HTML edit mode. Don’t paste it in the Visual mode, otherwise it WILL be visible.
7. After publishing and when your post shows up in your feed, go back to Digg, log back in, and follow step 2 and 3 above to get back to the Import Feeds area. Then Verify your feed.
8. If all goes well, it should verify. Now, the NEXT time and all future times you post, it will be automatically posted to Digg (there could be a delay).
Enjoy!
More aboutAutomatically Submit Your Blog RSS Feed to Digg

How to Customize “Newer + Older Posts” Link in Blogger Footer


If you are a blogger user then you might know that old ugly looking link for Newer-Older Posts and Homepage. So I decided to change this thing in my blog and now will tell you how to do it in your blog easily. This will help you in easy blog navigation for your blog readers also it will look more attractive than previous thus it will help in increase in page views.

How to do this?

First of all backup your template for any unnecessary problems and for each trick we will go to LAYOUT ► EDIT HTML ► and then click on Expand widget templates.


Then there try to locate this code:
<b:includable id='nextprev'>
<div class='blog-pager' id='blog-pager'>
<b:if cond='data:newerPageUrl'> <span id='blog-pager-newer-link'> <a class='blog-pager-newer-link' expr:href='data:newerPageUrl' expr:id='data:widget.instanceId + &quot;_blog-pager-newer-link&quot;' expr:title='data:newerPageTitle'><data:newerPageTitle/></a> </span> </b:if>
<b:if cond=’data:olderPageUrl’> <span id=’blog-pager-older-link’> <a class=’blog-pager-older-link’ expr:href=’data:olderPageUrl’ expr:id=’data:widget.instanceId + &quot;_blog-pager-older-link&quot;’ expr:title=’data:olderPageTitle’><data:olderPageTitle/></a> </span> </b:if>
<b:if cond=’data:blog.homepageUrl != data:blog.url’> <a class=’home-link’ expr:href=’data:blog.homepageUrl’><data:homeMsg/></a> <b:else/> <b:if cond=’data:newerPageUrl’> <a class=’home-link’ expr:href=’data:blog.homepageUrl’><data:homeMsg/></a> </b:if> </b:if>
</div>
<div class=’clear’/>
</b:includable>
Here part highlighted in Red is for Newer Post link, Green for Homepage and Blue for Older Post link.
Trick1. Modifying the Text
In this trick I will tell you how you can just do a simple gambling of text in your template to make it read better.
Just replace the following parts from the above given code from your template:
  • replace <data:newerPageTitle/> with, for example NEXT POST.
  • replace <data:olderPageTitle/> with, for example PREVIOUS POST.
  • replace <data:homeMsg/> (only the first one) with, for example HOMEPAGE.
Trick2. Adding icons near to it
In this trick I will tell you how you can just add a nice looking icon near to the text.
To place an Icon before Newer Post or any text which you have used; just place below codebefore <data:newerPageTitle/>
Here is the code:
<img src='http://i42.tinypic.com/1zzjpk1.png'/>
To place an Icon after Older Post or any text which you have used; just place below codeafter <data:olderPageTitle/>
Here is the code:
<img src='http://i42.tinypic.com/34ns01u.png'/>
Here you can use your own set of icons; for this just replace the tinypic image link with yours image link.
Trick3. Adding Only Images in place of text

In this trick I will tell you how you can add only images in place of text.
  • replace <data:newerPageTitle/> for Next Post with <img src=’YOUR-IMAGE-LINK‘/>
  • replace <data:olderPageTitle/> for Older Post with <img src=’YOUR-IMAGE-LINK‘/>
  • replace <data:homeMsg/> for Homepage with <img src=’YOUR-IMAGE-LINK‘/>
Make sure to replace the highlighted part above with your image link.
More aboutHow to Customize “Newer + Older Posts” Link in Blogger Footer

How to enable comments for pages

"I have created new pages and would like people to be able to leave comments"

To enable comments, go to Dashboard, click EDIT POSTS,then EDIT PAGES and you will see the pages you have added to your blog:

Blogger Edit Pages in Dashboard


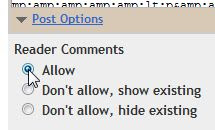
Click EDIT for the page which you want to enable comments, then at the bottom left corner of the resulting "page editor", click POST OPTIONS and in the options under READERS COMMENTS: 

Blogge POST OPTIONS for READERS COMMENTS


tick (.) Allow to allow readers comments, then clickPUBLISH.
More aboutHow to enable comments for pages